Tuesday, 21 August 2012

Spiral green vessel


As I was working on design ideas for the wrapped yarn samples over the weekend, I decided to finish the green sample that I showed you last week. The sample was designed to work on the flat and be part of a much larger suspended wall piece like 'sunburst'. As I didn't like the joining method that kind of stopped it in its tracks.

So what to do with this little sample? Although this was a tester for wrapping several wires together, it also tested the support method for larger organic shapes. This has worked well and these shapes moulded into a small vessel hold their form successfully. I think they would be even stronger with the wrapped method so I'm very excited to try that out as soon as possible.


I still like the design ideas I had for the large wall pieces so I'm wondering how wrapping would give me more flexiblity of design there too........ and what if the circles vessels were wrapped, how would that affect the stability of the structure - could I go bigger and bigger?? It would be so cool to have something large enough to actually walk inside - imagine!! 

So many possibilities! Got a lot of sampling to do before I get there but let's see where it goes :)

See you all tomorrow,
elaine x


Sunday, 19 August 2012

Jubilee beaded earrings


So this was the project that started me making beaded jewellery. I was following a link from some jewellery pictures on Pinterest and ended up at Off the Beaded Path's how-to video of these lovely earrings. They looked super complex to do and a bit of a challenge - so obviously I was interested :) I followed the how-to video closely which was very, very good indeed. So that decided me. This I had to try.

I didn't want to commit to buying a huge amount of beads in case I found it frustrating or too fiddly so I opted to buy her kit version on her Etsy shop as a treat to myself - and it was really nice to have all the right beads and findings to hand for my first attempt! There are four colourways but I liked this version best. Much more subtle than the red, white and blue version!! (click the shop link if you fancy seeing that :)) I didn't have to wait long for delivery from the US to the UK either so within a week, I was able to get beading.


The kit was great - all the beads needed, thread, beading needle and a very detailed PDF instruction booklet on disk. The book was easy to follow as well but I preferred the video myself as it was literally in real time and I could see every stage as she went - and it was super easy to pause and fix anything as I followed.

This was maybe a little ambitious for a first project as the bead weaving is quite complex compared to a lot of other things I've tried this month - like the monastic weave - but if you have patience with yourself and follow the video or booklet then you end up with a huge sense of achievement as well as a lovely pair of earrings. It teaches you a lot about the construction of beaded designs too which was really helpful.


Because I got on well with the how-to video, I've subscribed to her Youtube channel where you can see all her new jewellery how-to's every week. There's a good back catalogue there if you're interested too. So many projects I'd like to try but I have to wait till my beads arrive - sigh. But I've earmarked a few bracelet designs there and on Pinterest so I'm all ready to go as soon as that parcel arrives at the door!!!

Still got a lot of painting and decorating to do this week but I have mananged to start the Camino bubbles pattern I mentioned yesterday. Knitting is always good to relax with so I'm looking forward to doing more of that tomorrow.

Hope you've all been having a good weekend, see you soon!
elaine x


Saturday, 18 August 2012

Creative update - 2 weeks in!

1. turquoise ring, 2. waves and ladders, 3. copper wrapped earrings, 4. Sparkly!, 5. swirl sample, 6. spiral pendant, 7. Hand dyed yarn, 8. firebird, 9. turquoise ring, 10. green shield 2, 11. turquoise monastic weave, 12. copper bracelet, 13. knitted bracelet


It occurred to me today as I was looking through all the projects so far that we are two weeks into the creative challenge this month - already! So I thought I'd put together a little mosaic of everything so far. The rainbow bag and the colourwork didn't make it to the final cut but hopefully the bag will make a reappearance nearer the end of the month.

It's interesting to see when you give yourself an open ended project like this what you actually decide to spend your time doing. There's a lot more jewellery going on than textiles isn't there! But I'm glad that the vessels are making a comeback even in a small way. I'm thinking that the green swirly wrapped yarn sample (bottom left)  is big enough to be moulded into a vessel - excited to see what that looks like!

And I'm wanting to try out more experimental knitting - patterns with a bit of a challenge to them. One that caught my eye today was the lovely Camino bubbles pattern by Kieran Foley. I've already printed out the pattern and have the yarn ready for that. If I get a chance I'll start it tomorrow. There are a lot of charts so I'll give myself some time to work it out first, but hopefully it will be a quick fun knit :) Looks like a lot of Knit/Labs patterns are quite challenging so I think I'll be back to try some more after this one too. If you're on Ravelry, you can check out their pattern page here or go to their website instead. Definitely worth a look.

Back tomorrow with another project for you but till then enjoy your weekend:)


Friday, 17 August 2012

Monastic bead weaving


After making the rings yesterday, I fancied trying out this bead weaving technique. I have more of those turquoise blue beads I used for the ring and I thought it would make a nice chunky necklace using this technique. First though I tried out a small one to get the hang of the threading. I've tried double needle beading before so I kind of knew how this was going to be constructed but I used a schematic for reference as I went though. (Edit: Sadly this link is no longer working but I have found another great site that shows a great step by step tutorial for this here )

This technique is called monastic bead weaving or right angled weave - if you go to Youtube there are many video how-to's. They were very helpful to get a basic understanding of construction although I wanted to add small seed beads so I had to adapt as I went. Took a few attempts to get what I wanted but I got there. After taking this pattern back a few times, you certainly get to know it well:)  The Amethyst weave uses 6mm AB glass round beads which have a lovely pearescent sheen to them, and size 11 metallic plum iris seed beads. In certain lights the gold comes out more than the plum so it gives lovely subtle contrast.


Then I moved on to the lovely turquoise chunky beads. These are about 8mm compared to the 6mm amethyst ones above, and I used some white pearl size 11 seed beads in between on a 6lb crystal fireline. I think the nylon thread could have done with being a bit thicker as these glass beads are heavy!! It was a bit more difficult to keep the weaving in place as I worked but once I re-inforced the structure by going around the beads again, it pulled everything more into shape and made a stronger finished pendant.

I added a seed bead loop for a chain or ribbon but I'd like to use a more secure method of hanging next time. A chain may eventually break the thread and then it would all unravel - not good! I'm sure I've seen some other methods on my travels, I'll have to find them and try them out. 


I am really enjoying the beading and learning all the new patterns and construction methods, although I need more practice on good finishing where the thread doesn't show quite so much - well, that or some clear nylon thread :)

There might not be so much creative time over this weekend as I've been postponing the painting and decorating in the living room. So the sooner I can get that done, the sooner I can get back to play! I do have a few projects I've done quite recently that I'd like to show you, especially the silver sea glass ring course I went on last month and my first beaded earrings which I love. It really is a shame I don't have pierced ears you know. The irony isn't lost on me :))

Till tomorrow, paint brush in hand, goodnight!


Thursday, 16 August 2012

Wrapped rings


Today, I woke up very late but still tired and realised I've been pushing myself just a little much lately. My chronic fatigue has decided to kick in and slow me down, so today I decided to have a no stress, relaxing day off. Of course I only lasted a few hours before I started to tinker with some wire..... and then some beads.... then I was hunting for a tutorial in my pinterest folders..... and voila, some wrapped rings kind of just appeared :)


First the turquoise one with silver wire. The method is really simple but fiddly and I found that it makes a huge difference if you have the proper gauge of wire as it makes bending these forms so much easier. Of course as I'm just starting, I'm using what I've got on hand - which probably isn't the right weight at all! Apparently they recommend gauge 20-22, I think that's about 0.6mm? I'll have to get gemmed up on all this so I can achieve a more professional finish for the effort put in. No fun fighting the wire every time, is there?

As I felt I hadn't got a hang of the wrapping properly I decided to make another one and thought maybe twisting two strands could give an interesting finish to a simpler bead. Of course, my hand drill was in the shed and it was absolutely pouring down outside but I made a dash for it! And this is the result, a burnt orange bead with smoky coloured wire, twisted with two strands and wrapped.


I rather like the twisted effect on this one and with the darker coloured wire, gives it an older, antique feel. Just the right amount of texture to balance the slight grain on the wooden bead. This one wrapped easier as the wire was much lighter and more flexible. Good for the stone wrapping but possibly a bit flimsy for the band of the ring. I'm thinking three twisted strands might be about the right weight. I'll have to try that out.


The last one I made was this amethyst glass bead with silver coloured wire. This wire is nice and sturdy for the band but a bit tough to wrap but after two rings down, I thought I'd give it another go to see if it was just me needing more practice or the wire :) A bit of both I think!! So I wrapped, practiced and tried hard to get as even and precise wrapping as I could. Twice. The first one was way too big for my fingers as the circular dowelling I had instead of a mandrel was just a bit wide for my fingers - perfect for male size though. So I improvised and the second one now fits me nicely.

I still need a bit more practice but the right weight of wire is going to be the best way I can improve my skills I think. I'd like to make some more but I'll wait till my bead order arrives first so I can have more choice of stones - it's late though, so I hope it's not forgotten or lost somewhere in the land of freight and customs :(  Fingers crossed it arrives soon!

See you all tomorrow, as always, good to have you along;)
elaine x


Wednesday, 15 August 2012

Spiral pendant

 
Today has mostly been about designing and bending wire into swirly shapes ready for some yarn wrapping sampling tomorrow. It took a bit longer than I expected to get it all prepared so running a bit late tonight with the blog.

I did manage to do a little playing around with wire and beads as well though. I found some more wire today that wasn't copper so I thought I'd try its thickness out for swirling and wrapping. Very nice weight for the swirls. I don't have any thin silver for the wrapping though so I used a smoky coloured wire instead. It doesn't look quite as contrasting in daylight as the picture but I do like the antique quality it gives.

The beads are a mixture of glass, wood and seedpod giving it a more natural feel. Using the dark cord instead of a light silver chain also lends to the overall boho chic thing going on :) This is made as a pendant but earrings would be lovely too.

Would you believe it took me longer to choose beads than make the pendant? I seem to have a lot of small beads that are lovely but won't fit over the thickness of the wire so I'm going to start honing my bead radar when I'm out and about from now on!


I haven't decided if I'll introduce beads to this sample yet. There's lots of potential so I'll see as I go. It will be good to introduce colour tomorrow too, it looks rather plain without it's covering yet. I've got another few new yarns to try out for wrapping so it will be interesting to see which ones work with this new design sample. I'm thinking something colourful could be fun. 

Well, that's a lot of wrapping planned - I think I'll need a good film to watch as I work :) Thank you as always for joining me and a big hello to everyone new following me here on the blog. It's good to have you here :)

See you all tomorrow with some colour progress!


Tuesday, 14 August 2012

To crochet or to wrap.....


Yesterday's little experiment in wrapping made me go hunt out my old vessels sketchbook and samples. I wanted to revisit my ideas with these new techniques in mind and see how I viewed them now. Well, the first thing I thought was - OMG! I can't show you this!! The finish on this green sample is terrible!! Seems like all that small jewellery wrapping has given me a finer eye for the finishing than I had before. And I thought I was being fussy then:) Compared to the wrapped wire, this crochet version looks a lot heavier by comparison. But it's all good. It means I'm making progress! Also the wire ends bent over were just a temporary solution till I found a better way of finishing the wire. Now, I have several solutions I can try. What difference a year makes.

It was very interesting though as my design ideas are still just what I want to achieve, so it was just the techniques that were holding me back from producing them. It will be a good starting place for new work and hopefully I can develop and refine them with less practical limitations in the structure now.

sketchbook design from last year.

It is amazing how similar this sketchbook drawing is to the ideas I'm making now - even to the wrapping detail. The little shield design was for a large wall piece I wanted to make then, but I'm thinking it would look lovely as a piece of jewellery now - with some simplification, I think!!

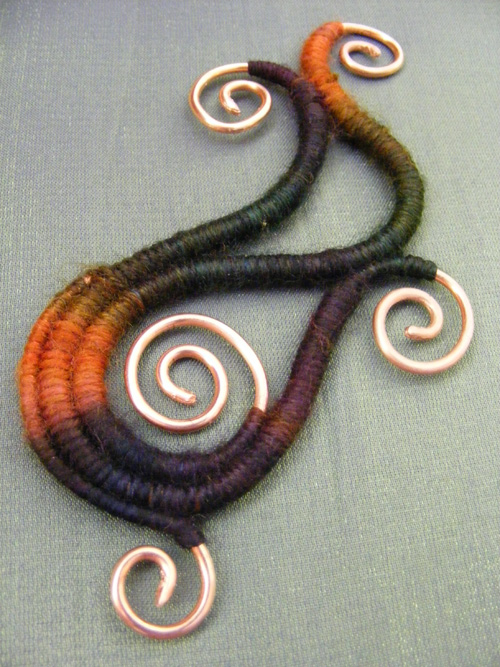
You can also see with these earlier samples that the dyed yarn has only subtle colour variations. I liked this fact at the time but now I've seen the smaller colour runs in my new yarns, I've changed my mind. Although the subtle details in the greeny/blues are lovely close-up, from a distance they look a solid 'green', not much distinction at all.  I'll have to play some more with colour before I get the balance completely right I think. But it's getting closer:)


I do like the crochet stitch ridged detail down one side, especially around the spiralled ends but it does seem to get a bit messy when it joins another strand. The yarn wrapping avoids that problem entirely. So is the crochet slip stitch wrapping necessary or will just yarn wrapping by hand be a better solution and give a cleaner finish?

I think I will try a small experiment and reproduce a section of this design using the new yarns and wrapping instead of the crochet. It will be interesting to compare and contrast the results. That will certainly be a two or three day project at least so I'll post my progress as I go. I'm sure a few new jewellery techniques will be tried out as well. I keep finding new inspiring images and techniques I'd love to try and I like having little projects on the go as well as bigger ones too. I'm also expecting a little order of beads sometime soon so that is bound to distract me somewhat :)


Well, it's been an interesting day looking through my sketchbook and seeing what ideas I had then. It's obvious I hadn't managed to push the design side a lot so I'm eager to get past the practicalities now and onto exploring the new ideas!

Off to catch a good nights sleep now to be all fresh for tomorrow, so thank you for accompanying me today on the creative journey. See you all soon!


Vessel experiments


Today I've been pulling together all the ideas and techniques I'm wanting to use in my next set of experiments for some new vessels. One newly dyed yarn skein, wrapping, swirly copper and here we have the visual beginnings of something organic that can grow and morph into any shape, form or direction.

The sticking point for me with textile 3D forms has always been supporting the form without compromising the asthetic of the piece. The wire works well to a point but closed units like the circles have flexible joins that destabilise the piece the larger it gets. Using the wrapping technique as well, I'm hoping that this issue will be resolved. If support is no longer an issue, then I can be much freer in the design and organic elements of the form.


So today has been really exciting! Putting these lightbulb moments to the test :) This little sample is testing out so many things: multiple wrapped strands, exposing the copper swirls and does it work with the dyed yarns? And does this type of dyeing technique suit the wire wrapping? How to hide the yarn ends, how to smoothly taper from the covered wire to the bare copper .... you get the picture! So many questions.

And I got pretty much all the answers I needed today too. The wrapping technique I'm pretty impressed with. It gives a neat tight finish in the yarn as well as in wire so that is a big plus. It's more difficult to colour match when the organic strands meet but I think they look okay. I kind of messed up one of them trying a different method to interlock the threads so I could keep the two separate colours - where the orange strand meets the purple one. The technique worked fine, it was just my lack of finesse that spoiled it! A bit more practice needed I think :)

The new yarn worked out a lot better than I thought too. I've come to learn with these vessels that yarn looks completely different than it would knitted up. You learn to look at the yarns with a different eye. This yarn had small runs of colour so I could get more colour changes in each small piece. And although it looked kind of boring as a skein, it looks so much better wrapped here. Quite a subtle palette for me but still lovely rich and intense colours.


The next obvious step is adding beads and metal or glass inclusions in the larger spaces. There are still some techniques I'll have to master yet so it will take some time to get all the elements I want into the vessels  - but I'm getting closer! I'll have to try a bigger sample to test the solidity of the wrapping first before I get carried away with the decorative details, lol!

It will be good to be able to see all these ideas I've had for so long appear in reality. This turned out so much better than I expected today. When it feels important that everything works out well, you kind of prepare yourself for things to go pearshaped :) But no pears today, and if there are a few hiccups then who knows, it might make it even better than the original intention!

See you all tomorrow!

Oh yes, if you want to see any of the earlier vessels you can find them here or just click on the gallery tab at the top of the blog. Links to each piece are under the slideshow ;) 


LinkWithin

Related Posts with Thumbnails