
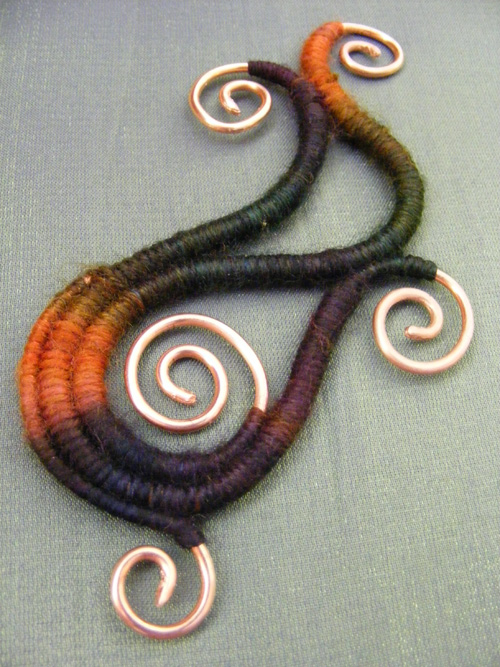
Today I've been pulling together all the ideas and techniques I'm wanting to use in my next set of experiments for some new vessels. One newly dyed yarn skein, wrapping, swirly copper and here we have the visual beginnings of something organic that can grow and morph into any shape, form or direction.
The sticking point for me with textile 3D forms has always been supporting the form without compromising the asthetic of the piece. The wire works well to a point but closed units like the circles have flexible joins that destabilise the piece the larger it gets. Using the wrapping technique as well, I'm hoping that this issue will be resolved. If support is no longer an issue, then I can be much freer in the design and organic elements of the form.
The sticking point for me with textile 3D forms has always been supporting the form without compromising the asthetic of the piece. The wire works well to a point but closed units like the circles have flexible joins that destabilise the piece the larger it gets. Using the wrapping technique as well, I'm hoping that this issue will be resolved. If support is no longer an issue, then I can be much freer in the design and organic elements of the form.

So today has been really exciting! Putting these lightbulb moments to the test :) This little sample is testing out so many things: multiple wrapped strands, exposing the copper swirls and does it work with the dyed yarns? And does this type of dyeing technique suit the wire wrapping? How to hide the yarn ends, how to smoothly taper from the covered wire to the bare copper .... you get the picture! So many questions.
And I got pretty much all the answers I needed today too. The wrapping technique I'm pretty impressed with. It gives a neat tight finish in the yarn as well as in wire so that is a big plus. It's more difficult to colour match when the organic strands meet but I think they look okay. I kind of messed up one of them trying a different method to interlock the threads so I could keep the two separate colours - where the orange strand meets the purple one. The technique worked fine, it was just my lack of finesse that spoiled it! A bit more practice needed I think :)
The new yarn worked out a lot better than I thought too. I've come to learn with these vessels that yarn looks completely different than it would knitted up. You learn to look at the yarns with a different eye. This yarn had small runs of colour so I could get more colour changes in each small piece. And although it looked kind of boring as a skein, it looks so much better wrapped here. Quite a subtle palette for me but still lovely rich and intense colours.
The new yarn worked out a lot better than I thought too. I've come to learn with these vessels that yarn looks completely different than it would knitted up. You learn to look at the yarns with a different eye. This yarn had small runs of colour so I could get more colour changes in each small piece. And although it looked kind of boring as a skein, it looks so much better wrapped here. Quite a subtle palette for me but still lovely rich and intense colours.

The next obvious step is adding beads and metal or glass inclusions in the larger spaces. There are still some techniques I'll have to master yet
so it will take some time to get all the elements I want into the vessels - but I'm getting closer!
I'll have to try a bigger sample to test the solidity of the wrapping
first before I get carried away with the decorative details, lol!
It will be good to be able to see all these ideas I've had for so long appear in reality. This turned out so much better than I expected today. When it feels important that everything works out well, you kind of prepare yourself for things to go pearshaped :) But no pears today, and if there are a few hiccups then who knows, it might make it even better than the original intention!
See you all tomorrow!
Oh yes, if you want to see any of the earlier vessels you can find them here or just click on the gallery tab at the top of the blog. Links to each piece are under the slideshow ;)
See you all tomorrow!
Oh yes, if you want to see any of the earlier vessels you can find them here or just click on the gallery tab at the top of the blog. Links to each piece are under the slideshow ;)


