Showing posts with label vessel. Show all posts

Monday, 7 October 2013

Synchronicity


It's that time of the year again. Makers everywhere are drawing up their making lists for  - sssh - christmas. Or if they haven't, they're running late!! After creating a rather splendid list that I know will be slashed to at least half its size come November, I realised I haven't blogged since this time last year!!!!! How did that happen?

Well, indifferent health has kept my creative mojo on the back burner mostly but I think I got out of the habit of blogging, then wondered if I really needed to as I share little updates on facebook more often these days. So I've been pondering whether to start again or not. But something odd happened when I wrote that list. My knitting goddess decided to emerge, all rested up and ready to take on fancy intarsia mitts, lacy scarves and even finish some UFO's - unfinished objects  - from the depths of the hidden UFO stash. Hand to head, what's come over me? lol! Whatever it is, welcome back!!

So there's knitting on the needles and jewellery plans on the go too - even possibly selling some jewellery in my Etsy shop - so there should be regular posts again. Yay! I've missed talking to you all.

Synchronicity though.

Well, it's been a weird week for that I'll tell you. First my knitting mojo comes back full force, then today when I've been thinking about making some new artwork, I get two e-mails encouraging me to do just that! I think it's a sign! lol! Yeah, a sign to get my creative ass in gear again and enjoy myself making, designing and hopefully even make a living from this somehow?

So here's to new creative experimenting and hopefully more regular blogging ;)
Welcome back, hope to chat to you all soon!

elaine xxx

Saturday, 1 September 2012

Creative challenge complete!

      Weeks 3-4


1. spiral green vessel, 2. bracelet band, 3. Felted Pod, 4. Not available, 5. snakey, 6. jubilee earrings 2, 7. Not available, 8. snakey bracelet, 9. Pod detail, 10. green shield 2, 11. camino bubbles, 12. button detail, 13. jubilee earrings 3


Now we've moved into September, I thought I'd collate all the projects from the last two weeks of August's creative challenge into a little mosaic. Seems I made less finished pieces in the last fortnight but quite a few were two day tasks or more, so that's cool. As much as I like the excitement of making something in a day, the more complex patterns and experimental vessels are just not that quick! But sometimes the best ideas take time to grow if they're given a little space.

It's been a very interesting creative month where I've learned new wire and beading skills, refreshed on some textile ones like felting and the crochet wrapping, and of course it's always fun exploring new challenging knitting patterns! There are a few experimental samples that I'd like to revisit from this group of projects - the camino bubbles is ongoing and I feel there will be a few more little pods to keep POD company:) And I do intend to get back into pattern writing so the crochet lace parasol will be a definite contender.

     Weeks 1-2

1. turquoise ring, 2. waves and ladders, 3. copper wrapped earrings, 4. Sparkly!, 5. swirl sample, 6. spiral pendant, 7. Hand dyed yarn, 8. firebird, 9. turquoise ring, 10. green shield 2, 11. turquoise monastic weave, 12. copper bracelet, 13. knitted bracelet

Looking at the whole month overall, I am surprised at how much jewellery has made it's way into my creative journey. The wire wrapping is especially important as I can intergrate that into my vessels and hopefully take them to the next level. The beaded jewellery has been a very happy surprise. I've found that I just love constructing with beads. I suppose all my projects have a strong emphasis on construction at the moment - wrapping, weaving, knitting, even felting.

So where to now? Well, I have a good creative flow going on right now so I'm going to see where the creative journey takes me this month. Maybe slowing down just a little though but I'll still be posting every day or two. I'd like to spend some time designing patterns and doing more sketchbook work on new directions for the vessels too. I have a few ideas percolating away :)

I've also got ideas to open a jewellery etsy shop soon as at the rate I'm making beaded bracelets I could seriously stock a shop, lol! And I'm going to re-open my dyed yarn Esty shop for a bit too. I remembered this month how much I love playing with colour and I couldn't use all the yarn I'd dye - even if I tried super hard!! So when I dye some up for my vessels or create more graduating colourways, I'll pop some in the shop as well. I'll let you know in advance if anyone is interested.

But for now, I'm going to take the rest of the weekend off and knit me some camino bubbles watching a film - or two!

See you next week and thank you all for following and supporting me this month!
elaine x


Friday, 31 August 2012

Little felted pod...


Once upon a time there was a little felted pod. He started off a lot bigger but got felted and pulled and shaped and felted.... again and again. And he began to shrink, just a little. At one point you couldn't even see the lovely colours on his surface there was so much soap. But he began to notice that he could keep his organic curves better now and he was kind of liking the deliberate lopsidedness of his shape.

When he was put beside the other stones in the garden, he thought he was the best dressed Pod in the neighbourhood :) He had lovely ochre yellows and grey/green contrasts with some nifty highlights in there too. And as if to prove that, he was now getting lots of attention from someone with a camera, obviously admiring his looks!


So he maganimously obliged and gave a few poses showing off all his lovely colours from many angles. Click, click... and a close-up? Of course, don't mind if you do..... did you catch that lovely orangey/yellow detail?... you did! Excellent :) Click, click......


And then.... it was over. Pod relaxed again, contentedly basking in the sun. It would be nice, he thought lazily, to have some other little pods to talk to. Stones weren't the greatest of conversationalists. Maybe he could persuade the pod maker to create him some company? Now there was a very good idea.......

......and then they could all live happily ever after :)


Thursday, 30 August 2012

Felted pod - part one


Last night as I was finishing my blog post,  I had the notion of making a small felted pod, to get back into felt making again and explore 3D forms more. I just wanted to keep it a simple form so the colour and fleece qualities would stand out more.

I have lots of fleece in my stash but my favourites are the hand dyed ones I got from DT Craft & Design when I joined their Fibre adventure club a few years ago. Each month you got a dyed colourway with several types of fleece: roving, tops, silk tops, etc. Each bag was like a little treasure trove arriving each month :) I never got round to using it all so it's been sitting there waiting for the right project to come along - and for me to have enough energy to do some lovely felting again.

'Lovely lichen' -  Fibre adventure club december 2009

I must say I have sorely missed felting. I've really enjoyed my afternoon up to the elbows in fleece, soap suds and bubble wrap! I didn't realise how much satisfaction I get from playing with fibres and all that tactile yumminess!

I chose to work with 'Lovely lichen' as it had some gorgeously soft roving with contrasting delicate silk tops, and I was thinking these pod shapes would look interesting mimicking stones, or weathered dry stone walls - with lichen on them:)

The simple pod form uses a resist technique. In this case, I used a plastic circle inside and wrapped fleece around the form, alternating each flat side as I went, building up colour and tonal values. The detail and decoration went on as the last layer.


I've wrapped the layers and started fixing the top detailing in place here. The silk tops was a bit slippy and didn't want to bond with the roving much. I gave it extra rolls and more pressure with the bamboo mat and it mostly fused. I'll have to remember that next time I use it so I can open up the silk fibres more to get a better grip.

This was as far as I got today before my energy ran out. But I'm pleased with how far I managed. I haven't been able to do any felting since I got chronic fatigue so this is a huge step forward for me. I love felting but it is one of the most demanding techniques energy-wise. So today was also a test to see if I could manage - and I have a nearly finished pod -YES! :))) It has definitely taken me much longer than before but that doesn't matter - as long as I can felt again!


So what needs to be done to finish? I've got to the stage where I can now cut an opening for the pod and take out the plastic. The felted circle has now shrunk enough to be smaller than the plastic disk so it needs to come out, and the fleece - and the silk - is all well anchored in place. So next I have to felt the cut edge, smooth out the side seams, then start shaping the pod. So not much left to do, and then some photos. Felt can reflect the light and bleach out the colours, so capturing the true colours could take a while. It would look lovely on a stony beach, wouldn't it? :)

Well, I'm off  to bed now, to recharge my energy batteries for tomorrow. There is a pod waiting to be finished:)

See you all soon!
elaine x


Tuesday, 21 August 2012

Spiral green vessel


As I was working on design ideas for the wrapped yarn samples over the weekend, I decided to finish the green sample that I showed you last week. The sample was designed to work on the flat and be part of a much larger suspended wall piece like 'sunburst'. As I didn't like the joining method that kind of stopped it in its tracks.

So what to do with this little sample? Although this was a tester for wrapping several wires together, it also tested the support method for larger organic shapes. This has worked well and these shapes moulded into a small vessel hold their form successfully. I think they would be even stronger with the wrapped method so I'm very excited to try that out as soon as possible.


I still like the design ideas I had for the large wall pieces so I'm wondering how wrapping would give me more flexiblity of design there too........ and what if the circles vessels were wrapped, how would that affect the stability of the structure - could I go bigger and bigger?? It would be so cool to have something large enough to actually walk inside - imagine!! 

So many possibilities! Got a lot of sampling to do before I get there but let's see where it goes :)

See you all tomorrow,
elaine x


Saturday, 18 August 2012

Creative update - 2 weeks in!

1. turquoise ring, 2. waves and ladders, 3. copper wrapped earrings, 4. Sparkly!, 5. swirl sample, 6. spiral pendant, 7. Hand dyed yarn, 8. firebird, 9. turquoise ring, 10. green shield 2, 11. turquoise monastic weave, 12. copper bracelet, 13. knitted bracelet


It occurred to me today as I was looking through all the projects so far that we are two weeks into the creative challenge this month - already! So I thought I'd put together a little mosaic of everything so far. The rainbow bag and the colourwork didn't make it to the final cut but hopefully the bag will make a reappearance nearer the end of the month.

It's interesting to see when you give yourself an open ended project like this what you actually decide to spend your time doing. There's a lot more jewellery going on than textiles isn't there! But I'm glad that the vessels are making a comeback even in a small way. I'm thinking that the green swirly wrapped yarn sample (bottom left)  is big enough to be moulded into a vessel - excited to see what that looks like!

And I'm wanting to try out more experimental knitting - patterns with a bit of a challenge to them. One that caught my eye today was the lovely Camino bubbles pattern by Kieran Foley. I've already printed out the pattern and have the yarn ready for that. If I get a chance I'll start it tomorrow. There are a lot of charts so I'll give myself some time to work it out first, but hopefully it will be a quick fun knit :) Looks like a lot of Knit/Labs patterns are quite challenging so I think I'll be back to try some more after this one too. If you're on Ravelry, you can check out their pattern page here or go to their website instead. Definitely worth a look.

Back tomorrow with another project for you but till then enjoy your weekend:)


Tuesday, 14 August 2012

To crochet or to wrap.....


Yesterday's little experiment in wrapping made me go hunt out my old vessels sketchbook and samples. I wanted to revisit my ideas with these new techniques in mind and see how I viewed them now. Well, the first thing I thought was - OMG! I can't show you this!! The finish on this green sample is terrible!! Seems like all that small jewellery wrapping has given me a finer eye for the finishing than I had before. And I thought I was being fussy then:) Compared to the wrapped wire, this crochet version looks a lot heavier by comparison. But it's all good. It means I'm making progress! Also the wire ends bent over were just a temporary solution till I found a better way of finishing the wire. Now, I have several solutions I can try. What difference a year makes.

It was very interesting though as my design ideas are still just what I want to achieve, so it was just the techniques that were holding me back from producing them. It will be a good starting place for new work and hopefully I can develop and refine them with less practical limitations in the structure now.

sketchbook design from last year.

It is amazing how similar this sketchbook drawing is to the ideas I'm making now - even to the wrapping detail. The little shield design was for a large wall piece I wanted to make then, but I'm thinking it would look lovely as a piece of jewellery now - with some simplification, I think!!

You can also see with these earlier samples that the dyed yarn has only subtle colour variations. I liked this fact at the time but now I've seen the smaller colour runs in my new yarns, I've changed my mind. Although the subtle details in the greeny/blues are lovely close-up, from a distance they look a solid 'green', not much distinction at all.  I'll have to play some more with colour before I get the balance completely right I think. But it's getting closer:)


I do like the crochet stitch ridged detail down one side, especially around the spiralled ends but it does seem to get a bit messy when it joins another strand. The yarn wrapping avoids that problem entirely. So is the crochet slip stitch wrapping necessary or will just yarn wrapping by hand be a better solution and give a cleaner finish?

I think I will try a small experiment and reproduce a section of this design using the new yarns and wrapping instead of the crochet. It will be interesting to compare and contrast the results. That will certainly be a two or three day project at least so I'll post my progress as I go. I'm sure a few new jewellery techniques will be tried out as well. I keep finding new inspiring images and techniques I'd love to try and I like having little projects on the go as well as bigger ones too. I'm also expecting a little order of beads sometime soon so that is bound to distract me somewhat :)


Well, it's been an interesting day looking through my sketchbook and seeing what ideas I had then. It's obvious I hadn't managed to push the design side a lot so I'm eager to get past the practicalities now and onto exploring the new ideas!

Off to catch a good nights sleep now to be all fresh for tomorrow, so thank you for accompanying me today on the creative journey. See you all soon!


Vessel experiments


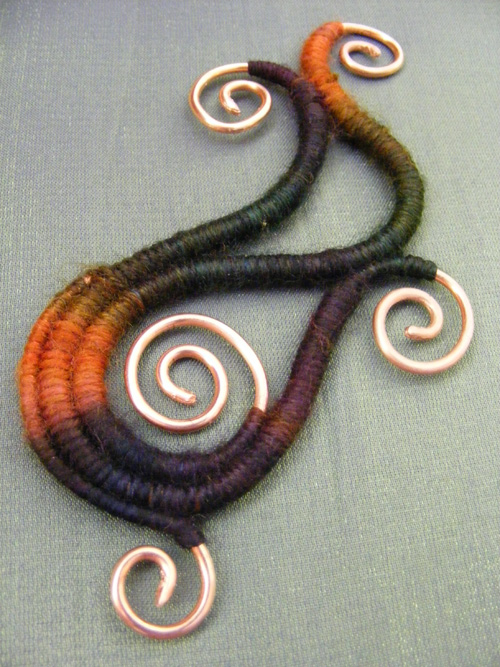
Today I've been pulling together all the ideas and techniques I'm wanting to use in my next set of experiments for some new vessels. One newly dyed yarn skein, wrapping, swirly copper and here we have the visual beginnings of something organic that can grow and morph into any shape, form or direction.

The sticking point for me with textile 3D forms has always been supporting the form without compromising the asthetic of the piece. The wire works well to a point but closed units like the circles have flexible joins that destabilise the piece the larger it gets. Using the wrapping technique as well, I'm hoping that this issue will be resolved. If support is no longer an issue, then I can be much freer in the design and organic elements of the form.


So today has been really exciting! Putting these lightbulb moments to the test :) This little sample is testing out so many things: multiple wrapped strands, exposing the copper swirls and does it work with the dyed yarns? And does this type of dyeing technique suit the wire wrapping? How to hide the yarn ends, how to smoothly taper from the covered wire to the bare copper .... you get the picture! So many questions.

And I got pretty much all the answers I needed today too. The wrapping technique I'm pretty impressed with. It gives a neat tight finish in the yarn as well as in wire so that is a big plus. It's more difficult to colour match when the organic strands meet but I think they look okay. I kind of messed up one of them trying a different method to interlock the threads so I could keep the two separate colours - where the orange strand meets the purple one. The technique worked fine, it was just my lack of finesse that spoiled it! A bit more practice needed I think :)

The new yarn worked out a lot better than I thought too. I've come to learn with these vessels that yarn looks completely different than it would knitted up. You learn to look at the yarns with a different eye. This yarn had small runs of colour so I could get more colour changes in each small piece. And although it looked kind of boring as a skein, it looks so much better wrapped here. Quite a subtle palette for me but still lovely rich and intense colours.


The next obvious step is adding beads and metal or glass inclusions in the larger spaces. There are still some techniques I'll have to master yet so it will take some time to get all the elements I want into the vessels  - but I'm getting closer! I'll have to try a bigger sample to test the solidity of the wrapping first before I get carried away with the decorative details, lol!

It will be good to be able to see all these ideas I've had for so long appear in reality. This turned out so much better than I expected today. When it feels important that everything works out well, you kind of prepare yourself for things to go pearshaped :) But no pears today, and if there are a few hiccups then who knows, it might make it even better than the original intention!

See you all tomorrow!

Oh yes, if you want to see any of the earlier vessels you can find them here or just click on the gallery tab at the top of the blog. Links to each piece are under the slideshow ;) 


Monday, 4 July 2011

Filigree circles


As promised, I have photos of the filigree circles vessel for you :) Although it still needs some more height and more considered shaping when I get nearer to the top, I think it's working out quite well so far. I didn't like the randomness of the dyed yarns at first but it's growing on me more now when you see it all assembled in the round.


A wee bit closer for you. Each side of the circles has a distinct look from the crochet chain. In the last vessels I deliberately matched like for like and then decided which side would be the 'right' side but I've decided to mix them as another layer of textural interest going on. It's amazing how more relaxed you can be creatively when you've already decided that this is a tester so it doesn't have to meet the standards you automatically set yourself - and it's working out so much better because of it. So everything is a tester from now on :))


And a lot closer now;) Circles within circles. You can see a bit more of the crochet definition and the graduating colours in this one too. I am still mulling over whether I like the 'perfect' circles the wire creates v's the more organic circular shapes created without a core.... practical support v's aesthetics.... but why not room for both? :)


And the last one using the light to create shadow circles on the table. So far this is a simple vessel/bowl shape but I think it has the potential to morph and grow into so much more. Thinking of lots of interesting 3D forms..... Thank you everyone for your supportive and helpful comments here and on flickr. It really helps me along the creative path as I develop these ideas of mine.

Let's see where it goes from here, shall we?
elaine x

Wednesday, 29 June 2011

Ongoing circles....


Just a quick progress check for you to see what I've been up to the last few days. The last time these crocheted circles made an appearance was away back at the end of february. Seems such a long time ago now. But I've been working on them on and off, crocheting and stitching away slowly, building up ideas and enough circles to make something with. This piece is more of an experiment - with a different type of wire (fail), with the length of dyed repeats (...maybe), and using families of regular circles to create the overall look. Mixed results so far.


It's not been in a hurry to emerge this one, just quietly ambling alongside all the other projects that have quickly come and gone. This month though, it has suddenly looked as if it is 'progressing' which gave me a spur to get working on it again! It's beginning to take on a 3D form and I've been taking newer photos today, playing with the form, light and shadows again so we'll be able to see them soon.


But for now, you can see the work in progress - my messy table! It's still not finished, still morphing and giving me new surface and 3D ideas which I'll have to get down on paper before I forget them:) - I think  more time has gone into my ideas sketchbook than on the final piece so far:)) To help maintain its 3D shape it will need a bit more height and since all these circles in the photo are now used up, it could well be time to get back to creating wire circles and plan a little more crochet.

I'm also getting the urge to dye more yarns to use for these forms so lots planned for you to see soon :)

Thursday, 14 October 2010

Sun and shadow


Hurrah! The sunburst vessel is finished - only it isn't quite a vessel any more! I've been crocheting away like mad this week to get this finished, confidently happy with my idea of a lovely wide, platter shaped vessel, and watching it slowly emerge. When I thought of these organic shapes, I realised I would need a simple form that would show them off to their best advantage so the previous bowl shapes were dropped quickly, and a shallow, broad expanse of curly swirly happiness sounded just the thing!


Putting them all together on the flat - ahhh:)) Now that is nice and bright, and yummily swirly. Kind of looks like very ornate script lettering in places..... But what about into the vessel shape??


Looking good I thought. Took a bit of time to get things placed just the way that looked best but I got there in the end and packed up another evening to get some shuteye. I had a niggling feeling I still wasn't showing this off to its best advantage but decided to sleep on it and hope for a fresh perspective in the morning. Luckily for me I didn't have to wait quite so long! You know how sometimes when you are very tired, your conscious mind has pretty much switched off and you're working on automatic pilot? Yup? Well, I was switching everything off for the night (including me) and heading up the stairs, passing the bowl dimly lit by the stair light, and it hit me. What if it wasn't a bowl?

I have been so locked into thinking 'vessel' that I had missed the obvious - a FLAT piece. Oh, the irony:)) Having a lightbulb moment when that fatigued doesn't do much to promote a restful night's sleep so I gave up and tried hanging it on the wall instead. Tah-da!


Oh, I like! Then I noticed the shadows it was creating....... ooooh! Off the wall it came and back up it went about a foot away, suspended quickly with some cotton from the ceiling. TAH-DA!!


Oh now, what would this be like as a ginormous circle? (Forgetting the fact that this has taken about two solid weeks to make and is only about 45cm/18" in diameter...) Looking at this impartially, the units are a bit too large in scale for the present diameter and would balance a lot better in a larger circle but I will have to have enough dyed yarn and patience to make such a big piece - as well as somewhere to hang it when its finished:))) But I'm thinking I'll have to have a go, somewhere in the near future. Until then, I'll reduce the motif size and stick to a more manageable scale - for now.....:)))


But on to the more practical aspects of the making. The wire is a total success. It bent so easily, maintained the shapes and as long as the spaces between didn't get too large, held together well. The units were stitched together as invisibly as I could make them and I tried to make sure there were enough joins for stability, without compromising the flow of the pattern too much.


The crocheted units have two distinct sides as well. There is the 'right' side which looks nice and smooth and the back which has more visual texture due to the form of the crocheted slip stitch. Again, I fully intended to have the right side facing out but when it was lit up for the photos, the reverse just came to life and it seemed really obvious that it should be the front. Happy surprises all round!


And lastly, the ends! Thank you everyone for all your very helpful and creative suggestions here, on flickr and on ravelry. I tried out a good few ideas but none seemed to gel well with these curly shapes. I eventually decided that any form of disguise was only drawing more attention where it wasn't wanted so I ended up exposing a bit of the lovely copper wire underneath and bending it into a small loop at each end. You can just see the loops in the close-up picture - little glints of copper (aaah, lovely!) - whilst practically helping to keep the stitches on the ends! It works for me till I can think of another solution.

So, it's all finished. I feel a little strange that this baby I've been working on has now been completed. It feels like I've been living with it constantly for so long that I don't want to start anything new quite yet. Maybe I need some quiet time to savour this little achievement and then get back into things tomorrow..... :)


Wednesday, 22 September 2010

Sunburst


I've been experimenting recently with lots of different ways to make strong enough 3D crochet vessels and I thought I'd give the most obvious method - wire - a try this time. I found some wires too inflexible and difficult to mould as well as being too skinny in diameter once crocheted,  so I decided to try wire with its plastic coating still on - like the ones you find in electric cables. In the UK that will be brown and blue colours:)  (the earth wire doesn't have a plastic coating inside the big grey tubing which I stripped off,  just the bare copper - which is very nice in its own right and I will keep for later!)


Ok, so I have my plastic coated wire, and now I can see how it moulds - yummy! Perfectly easily. I thought I'd have to use long nosed pliers but in fact they made little awkward bends rather than smooth curves so I just went with moulding it with my fingers.


Then I started to crochet around the wire with some of my stripey dyed sock yarn - this one is 'mango' ;) Oooh, I'm liking this! Lets get onto another shape and see how it looks......


Oh yes, I think this will work! I will still have to attach the units together like the flowers in the green vessel but that's ok. I'll have to work out a solution to the wire ends though. If I fold them, there will be an unsightly lump in the spiral - not ideal at all - and I have to make sure the end crochet stitches don't slip off either. I'm thinking a little spot of glue but I run the risk of sticky mess on the yarn.....

Aha! Maybe I crochet a little end cap thingy - picturing knitted i-cords here, only in crochet:) A little tube end before crocheting around the wire..... off to see how that works. Back soon!


Monday, 23 August 2010

Flower vessel


'Ello, ello, ello:)) Yes, I'm back! Whew, no break intended..... just kind of happened. My power supply went on my computer so I had to stop blogging, then once fixed, I didn't have much to post as my mojo upped and disappeared on me - but it's come back this week with a vengence! So I have lots to show you so hopefully I can get back into the habit of regular posting again. I've missed chatting with you all :)


Today's little project - which you may recognise from my new banner - is a further experiment with the crocheted vessel idea. I wanted to try making a bigger unit before joining them together, hopefully giving the piece greater inherent stability as well as less sewing for me:) The unit was meant to be a circle surrounded by other smaller circles but the method I used to form the second row of units ended up looking more like petals so the flower motif was born.


I haven't used any wire or other form of internal strengthening for this one as I wanted to see if the bigger unit alone would achieve this. As it is, this small bowl holds its own - just - but I wouldn't want to make it much bigger without reinforcement. I will try either starch or sugar water on this to see if it gives a nice light hold to the form - well, thats what I'm hoping anyway. The yarn used is a remnant of a stripey sock yarn I had in my stash. I liked the randomness of the colours but I knew it had large stripes which the motif can handle. I wouldn't want it getting too colour crowded though as I like the simple form and the shadows too. (I know, me liking form over colour - what next?!)


I've just started experimenting with wire inside the units now - although crocheting around the form is proving to be a tad awkward with all the unforgiving wire in the way, there is no flow to the making so far. And I don't think I'll be bothering if it's a right pain in the rear to make :) Well, I've a couple of methods to try so we'll see how it goes.

So back to the 3D crocheting and some more traditional crochet for you over the next few days - more pineapples, clusters and shells than you can shake a stick at:))

See you soon! elaine xxx

Tuesday, 29 June 2010

Filigree vessel


Two posts in one day! But now I've got my work in progress photographed, I was just bursting to show you what I've been up to this month. The problem of working on larger creative projects is that they take so long and don't look very exciting photographically speaking till near the end.

I've been playing with modular freeform crochet, building sections of crocheted loops into a 3D form. The original intention was to use white to focus solely on the form structure as I went, but for a lover of colour, I'm really liking the subtlety the white is giving me - especially with a light source behind creating all those interesting shadows.


Now the form is complete, the intention was to start incorporating wire and beads, weaving through the structure in an organic way, crossing and twisting over each other using different colours and thicknesses of metal wire and threading beads as I went. But now I like the simplicity of the white, would a riot of new colours and surface materials kill its delicacy? As it is, the form is not quite sturdy enough to sit on its own and maintain its pod-like shape and the wire's main purpose - other than being decorative:) - was to strengthen the form unobtrusively, so to speak.


I had considered using starch but it can leave a residue. Although the yarn used isn't all that special at this stage, it could be a feature I may not want to lose on another vessel. So, I think a series of small test samples are going to be needed exploring all these possibilities before I decide on a final course of action.


But it's all very exciting!! If I used starch, would that give a good ground to paint on? If I crocheted with wire instead, how would that look? Strength would no longer be an issue but what about the tactile element? Would there be enough fibre content to keep me happy? How could I incorporate more? I think I may have a series of vessels before I'm finished:))

I'll keep you posted!


LinkWithin

Related Posts with Thumbnails