Showing posts with label hand dyed yarn. Show all posts

Saturday, 1 September 2012

Creative challenge complete!

      Weeks 3-4


1. spiral green vessel, 2. bracelet band, 3. Felted Pod, 4. Not available, 5. snakey, 6. jubilee earrings 2, 7. Not available, 8. snakey bracelet, 9. Pod detail, 10. green shield 2, 11. camino bubbles, 12. button detail, 13. jubilee earrings 3


Now we've moved into September, I thought I'd collate all the projects from the last two weeks of August's creative challenge into a little mosaic. Seems I made less finished pieces in the last fortnight but quite a few were two day tasks or more, so that's cool. As much as I like the excitement of making something in a day, the more complex patterns and experimental vessels are just not that quick! But sometimes the best ideas take time to grow if they're given a little space.

It's been a very interesting creative month where I've learned new wire and beading skills, refreshed on some textile ones like felting and the crochet wrapping, and of course it's always fun exploring new challenging knitting patterns! There are a few experimental samples that I'd like to revisit from this group of projects - the camino bubbles is ongoing and I feel there will be a few more little pods to keep POD company:) And I do intend to get back into pattern writing so the crochet lace parasol will be a definite contender.

     Weeks 1-2

1. turquoise ring, 2. waves and ladders, 3. copper wrapped earrings, 4. Sparkly!, 5. swirl sample, 6. spiral pendant, 7. Hand dyed yarn, 8. firebird, 9. turquoise ring, 10. green shield 2, 11. turquoise monastic weave, 12. copper bracelet, 13. knitted bracelet

Looking at the whole month overall, I am surprised at how much jewellery has made it's way into my creative journey. The wire wrapping is especially important as I can intergrate that into my vessels and hopefully take them to the next level. The beaded jewellery has been a very happy surprise. I've found that I just love constructing with beads. I suppose all my projects have a strong emphasis on construction at the moment - wrapping, weaving, knitting, even felting.

So where to now? Well, I have a good creative flow going on right now so I'm going to see where the creative journey takes me this month. Maybe slowing down just a little though but I'll still be posting every day or two. I'd like to spend some time designing patterns and doing more sketchbook work on new directions for the vessels too. I have a few ideas percolating away :)

I've also got ideas to open a jewellery etsy shop soon as at the rate I'm making beaded bracelets I could seriously stock a shop, lol! And I'm going to re-open my dyed yarn Esty shop for a bit too. I remembered this month how much I love playing with colour and I couldn't use all the yarn I'd dye - even if I tried super hard!! So when I dye some up for my vessels or create more graduating colourways, I'll pop some in the shop as well. I'll let you know in advance if anyone is interested.

But for now, I'm going to take the rest of the weekend off and knit me some camino bubbles watching a film - or two!

See you next week and thank you all for following and supporting me this month!
elaine x


Saturday, 18 August 2012

Creative update - 2 weeks in!

1. turquoise ring, 2. waves and ladders, 3. copper wrapped earrings, 4. Sparkly!, 5. swirl sample, 6. spiral pendant, 7. Hand dyed yarn, 8. firebird, 9. turquoise ring, 10. green shield 2, 11. turquoise monastic weave, 12. copper bracelet, 13. knitted bracelet


It occurred to me today as I was looking through all the projects so far that we are two weeks into the creative challenge this month - already! So I thought I'd put together a little mosaic of everything so far. The rainbow bag and the colourwork didn't make it to the final cut but hopefully the bag will make a reappearance nearer the end of the month.

It's interesting to see when you give yourself an open ended project like this what you actually decide to spend your time doing. There's a lot more jewellery going on than textiles isn't there! But I'm glad that the vessels are making a comeback even in a small way. I'm thinking that the green swirly wrapped yarn sample (bottom left)  is big enough to be moulded into a vessel - excited to see what that looks like!

And I'm wanting to try out more experimental knitting - patterns with a bit of a challenge to them. One that caught my eye today was the lovely Camino bubbles pattern by Kieran Foley. I've already printed out the pattern and have the yarn ready for that. If I get a chance I'll start it tomorrow. There are a lot of charts so I'll give myself some time to work it out first, but hopefully it will be a quick fun knit :) Looks like a lot of Knit/Labs patterns are quite challenging so I think I'll be back to try some more after this one too. If you're on Ravelry, you can check out their pattern page here or go to their website instead. Definitely worth a look.

Back tomorrow with another project for you but till then enjoy your weekend:)


Tuesday, 14 August 2012

To crochet or to wrap.....


Yesterday's little experiment in wrapping made me go hunt out my old vessels sketchbook and samples. I wanted to revisit my ideas with these new techniques in mind and see how I viewed them now. Well, the first thing I thought was - OMG! I can't show you this!! The finish on this green sample is terrible!! Seems like all that small jewellery wrapping has given me a finer eye for the finishing than I had before. And I thought I was being fussy then:) Compared to the wrapped wire, this crochet version looks a lot heavier by comparison. But it's all good. It means I'm making progress! Also the wire ends bent over were just a temporary solution till I found a better way of finishing the wire. Now, I have several solutions I can try. What difference a year makes.

It was very interesting though as my design ideas are still just what I want to achieve, so it was just the techniques that were holding me back from producing them. It will be a good starting place for new work and hopefully I can develop and refine them with less practical limitations in the structure now.

sketchbook design from last year.

It is amazing how similar this sketchbook drawing is to the ideas I'm making now - even to the wrapping detail. The little shield design was for a large wall piece I wanted to make then, but I'm thinking it would look lovely as a piece of jewellery now - with some simplification, I think!!

You can also see with these earlier samples that the dyed yarn has only subtle colour variations. I liked this fact at the time but now I've seen the smaller colour runs in my new yarns, I've changed my mind. Although the subtle details in the greeny/blues are lovely close-up, from a distance they look a solid 'green', not much distinction at all.  I'll have to play some more with colour before I get the balance completely right I think. But it's getting closer:)


I do like the crochet stitch ridged detail down one side, especially around the spiralled ends but it does seem to get a bit messy when it joins another strand. The yarn wrapping avoids that problem entirely. So is the crochet slip stitch wrapping necessary or will just yarn wrapping by hand be a better solution and give a cleaner finish?

I think I will try a small experiment and reproduce a section of this design using the new yarns and wrapping instead of the crochet. It will be interesting to compare and contrast the results. That will certainly be a two or three day project at least so I'll post my progress as I go. I'm sure a few new jewellery techniques will be tried out as well. I keep finding new inspiring images and techniques I'd love to try and I like having little projects on the go as well as bigger ones too. I'm also expecting a little order of beads sometime soon so that is bound to distract me somewhat :)


Well, it's been an interesting day looking through my sketchbook and seeing what ideas I had then. It's obvious I hadn't managed to push the design side a lot so I'm eager to get past the practicalities now and onto exploring the new ideas!

Off to catch a good nights sleep now to be all fresh for tomorrow, so thank you for accompanying me today on the creative journey. See you all soon!


Vessel experiments


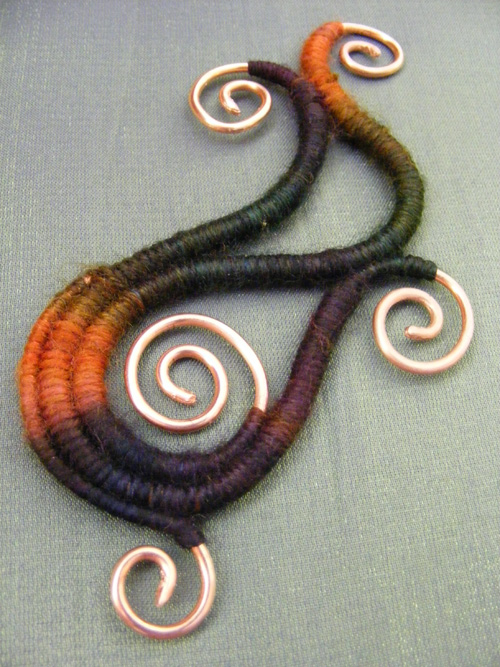
Today I've been pulling together all the ideas and techniques I'm wanting to use in my next set of experiments for some new vessels. One newly dyed yarn skein, wrapping, swirly copper and here we have the visual beginnings of something organic that can grow and morph into any shape, form or direction.

The sticking point for me with textile 3D forms has always been supporting the form without compromising the asthetic of the piece. The wire works well to a point but closed units like the circles have flexible joins that destabilise the piece the larger it gets. Using the wrapping technique as well, I'm hoping that this issue will be resolved. If support is no longer an issue, then I can be much freer in the design and organic elements of the form.


So today has been really exciting! Putting these lightbulb moments to the test :) This little sample is testing out so many things: multiple wrapped strands, exposing the copper swirls and does it work with the dyed yarns? And does this type of dyeing technique suit the wire wrapping? How to hide the yarn ends, how to smoothly taper from the covered wire to the bare copper .... you get the picture! So many questions.

And I got pretty much all the answers I needed today too. The wrapping technique I'm pretty impressed with. It gives a neat tight finish in the yarn as well as in wire so that is a big plus. It's more difficult to colour match when the organic strands meet but I think they look okay. I kind of messed up one of them trying a different method to interlock the threads so I could keep the two separate colours - where the orange strand meets the purple one. The technique worked fine, it was just my lack of finesse that spoiled it! A bit more practice needed I think :)

The new yarn worked out a lot better than I thought too. I've come to learn with these vessels that yarn looks completely different than it would knitted up. You learn to look at the yarns with a different eye. This yarn had small runs of colour so I could get more colour changes in each small piece. And although it looked kind of boring as a skein, it looks so much better wrapped here. Quite a subtle palette for me but still lovely rich and intense colours.


The next obvious step is adding beads and metal or glass inclusions in the larger spaces. There are still some techniques I'll have to master yet so it will take some time to get all the elements I want into the vessels  - but I'm getting closer! I'll have to try a bigger sample to test the solidity of the wrapping first before I get carried away with the decorative details, lol!

It will be good to be able to see all these ideas I've had for so long appear in reality. This turned out so much better than I expected today. When it feels important that everything works out well, you kind of prepare yourself for things to go pearshaped :) But no pears today, and if there are a few hiccups then who knows, it might make it even better than the original intention!

See you all tomorrow!

Oh yes, if you want to see any of the earlier vessels you can find them here or just click on the gallery tab at the top of the blog. Links to each piece are under the slideshow ;) 


Monday, 13 August 2012

French knitted wrap bracelet


As I was knitting up my little tester yarns from my dyeing session the other day, I remembered I had used one of my earlier dyed yarns to start making a knitted bracelet a wee while back. Where was it? How far had I got and was it looking good? A good rummage later and I had found it. A few more inches of french knitting, add a button and that was it! I couldn't believe I had that little to do before it was finished. Don't you love when that happens?

The photographs however took a lot longer. Don't know what it is about some colours, they just won't photograph well some days. The light was poor today and wet outside so this is as true as I could get. Pretty close. The knitted samples I'm working on though were a bit more stubborn so tomorrow I'll try again.
 

I was thinking this I-cord technique would be lovely for my new yarns too. They're coming out rather nicely with a definite long contrasting stripe to them. Quite fascinating to watch them knit up. Had to include a pic of my french knitting dolly - I've had her since I was a girl and she always makes me smile :) Makes nicely spaced I-cords too. I tried making this on a double ended needle to compare the cords. Works well either way really, just a matter of which feels more comfortable to you and gives you the best tension. Some dollies have large spacing that limits the weight of yarn you can use with it so if that's an issue, then the needle I-cord would work out better.

It does take a surprisingly long time to make a cord long enough to wrap around your wrist four of five times. I think that must have been why this one disappeared to the wayside for a bit!! It does give a soft, comfy fitted wrapped bracelet though and I love all the warm rich burnt reds and plums.


Tomorrow I'd like to get started on some of the vessel ideas using some of the dyed yarns. It will be interesting to see how they wrap up. I have a feeling they will be too regularly spaced colourwise and a non subtle striped effect but hey! there might be a happy surprise or two along the way, who knows? :)

Thank you for joining me today and see you all tomorrow for the next week of the creative journey!


Friday, 10 August 2012

Graduating colours


Creative day 7!

Today, I decided to play with colour again but using dyes. There are several different ideas I've been meaning to try out but hadn't got around to so with such a lovely sunny day, I thought it would be perfect drying weather :)

One thing I hadn't got around to much when I was dyeing sock yarns was graduating colour - the ones where the whole ball goes from light to dark in long runs of colour. These yarns work especially well for longer lace shawl patterns and parasols without colour repeats too. I've seen several methods of doing this so I thought I'd try them out.
 

First of all though, I had a play with mixing colours on the skein. These colour bands are quite close together so will knit up more of a zigzag yarn with short runs of colours. What I love about experimental yarns is that the quick changes and blends give you ideas for other yarns - like using a viewfinder to focus on new compositions. I like the soft ochres, aquas and purple/blues down at the bottom right of the skein especially.


And the burnt ochres and greens in this one. The pinks didn't photograph well I'm afraid whatever light I tried. It was just too bright - I shouldn't complain!! But there were more burnt reds with hints of lavendar fushia pink.

In the other mini samples, I was experimenting more with technique. They all look similar as an end result but each one used a different method of graduating the colour. I learned a lot today, so I can make lots more progress tomorrow on the back of today's experiments.

mini spriral of graduating colour

One of the graduating yarns experiments. Once I unravel this fully, it will be interesting to see how the colours look and knit up. Imagine this as a whole 100gm ball of yarn. Rather subtle colour scheme for me isn't it? :) Don't worry I managed to squeeze in a dayglow rainbow one too just for contrast!

So part way done with these. The technique has been tested, now the results need to be knitted up to see if they look good. They're only short lengths so that shouldn't take long. That's my weekend sorted I think.

Have a good weekend and see you all soon!


Sunday, 5 August 2012

Waves and ladders

Summit shawl sample

Day 2 of the creative challenge. And what have I been up to today? Well, a little bit of experimenting with knit as you can see! This beautiful pattern is where I have happily lost most of today. I was racing the light for last minute photos, I got so involved!

Ok, so knitting a shawl in a day is a bit much, but I have made a decent sample to explore the pattern construction. This lovely pattern Summit shawl by Mandi Harrington has been sitting in my Ravelry to-do list ever since it came out - March 2010 to be exact - so quite a wee while. In fact, all the bigger projects seem to gather dust there so I thought, wouldn't it be nice to just allow myself to do a little bit, as a tester, to see if I like it enough to make it. I love working out the construction of complex knits but kind of lose interest if I have to knit metres of the stuff! So this way I get the best of both worlds - I enjoy the doing but there's no pressure of a Finished Object.

And I've always loved the look of this one. It's beautifully designed and aimed at slightly higher than a beginner. The pattern says 2 out of 4 for difficulty so it looks complex but it only requires you to know a few of the easy stitches like M1, Kfb, Yo. The thing that makes this pattern so unusual is its use of short row knitting - where you knit each 'wavy' strand individually back and forth in sections - rather than a full row. Once you get your head around that, it makes a lovely logical structure. How happy am I when that happens? Happy happy:) - when you 'get' the pattern and know exactly how it will unfold from then on in. Harmony, that's it. Perfect harmony.


I wanted to try a few things out with this pattern too. Firstly to see how the short rows would affect a variegated hand dyed yarn and secondly if I didn't use the suggested silk how would it flow or drape in contrast. As to the first, you can see where the green sections meet the blue ones so although it isn't terribly contrasting, I think a semi-solid yarn would give the best effect, especially if you are going to spend the time dyeing your own like I do. So, good to know. Secondly, the handle of this fingering weight does have a lightness and won't slip as much when knitting silk but - well, silk is silk and who wouldn't prefer a silky draped shawl to a wool mix??

Despite our desire for expensive gorgeous silk, I think this will knit well in any smooth yarn and if it has a slight sheen or lustre to it, even better.  This pattern has an evening, dressing up feel to it so if I were to knit an actual shawl or smaller scarf, I'm thinking deep teals, reds or plums for me.

Casting on in sections                                                                        First ladder created
cast on row complete for my mini scarf (7 sections instead of 15) - all set up now for the first curve section
right curve
left curve

I've taken some photos as I went through each stage of the pattern so I can remember in the future how it's constructed. Hope this helps anyone who may be interested in trying this pattern out. After the initial set up section to get all the solid areas and ladders in place, you then develop the right curve section, then the left. That's it. You just keep waving those left and right curves and the pattern just appears. Wonderful!

This isn't a pattern to be knitting watching the tv though, so it was nice music as accompaniment today. Now I've got the construction clear in my head I've found it getting quicker and quicker to knit - which is excellent if you're going for full shawl size! One other thing I made myself do was double check the stitch count before dropping the stitch to create the ladder. It's much quicker to check again than have to reknit a dropped stitch in the wrong place:)  This lovely shawl is really worth the effort and just trust the pattern, it does work out perfectly, honest!

Tomorrow, I'll choose something that's a bit more manageable in a day, although I like the idea I can give you a follow-up on this too. I think I'll sleep well tonight - hope I don't see waves and ladders in my sleep!!

See you all tomorrow!

Thursday, 24 February 2011

Happy dance :)

Yesterday my creative mojo returned - to my great relief! I was on such a roll at the end of January with so many ideas buzzing around my head I couldn't make samples quick enough and then.....whumph.... a dry spell. Nada, nothing, zip. Maybe I used it all up in one go:) or maybe reality intervened and demanded my attention back in the real world, but may I say - welcome back! my life has been a bit flat without you!!


So new to the ideas pool is a variation on my filigree vessel. I'm just tinkering around with different wire types and strengths to crochet around and writing copious notes and ideas as I go. I thought I'd introduce some colour into the mix as the last one was uniform white and I wanted to compare and contrast a bit. The white one didn't have a wire base either and I'm seeing a lot of 3D moulding, bending and manipulating in this one's future.


I have the perfect circle shapes, then the ovals, and once I find the best wire, some organic squidgy shapes randomly altering the circumference any way it pleases. They might all work well together, they might prefer to be just a family of squidgy shapes instead. I don't know, but that is the beauty of it - and I never get bored experimenting:)


Beginning to group them together here but need to make more before I can gauge how effective they will be. The hand dyed yarn is working well on the bigger shapes but finishes abruptly on the smaller ones as the dye repeat is too long. But that's another element to play with! I don't want it overly stripey either so maybe just a slightly shorter length of skein. Or dye two varying length skeins the same colourway and hope I remember which is which!

Righty-ho, just another 10-20 more circles to go and then I can play with the 3D manipulation. Happy, happy! x

Thursday, 14 October 2010

Sun and shadow


Hurrah! The sunburst vessel is finished - only it isn't quite a vessel any more! I've been crocheting away like mad this week to get this finished, confidently happy with my idea of a lovely wide, platter shaped vessel, and watching it slowly emerge. When I thought of these organic shapes, I realised I would need a simple form that would show them off to their best advantage so the previous bowl shapes were dropped quickly, and a shallow, broad expanse of curly swirly happiness sounded just the thing!


Putting them all together on the flat - ahhh:)) Now that is nice and bright, and yummily swirly. Kind of looks like very ornate script lettering in places..... But what about into the vessel shape??


Looking good I thought. Took a bit of time to get things placed just the way that looked best but I got there in the end and packed up another evening to get some shuteye. I had a niggling feeling I still wasn't showing this off to its best advantage but decided to sleep on it and hope for a fresh perspective in the morning. Luckily for me I didn't have to wait quite so long! You know how sometimes when you are very tired, your conscious mind has pretty much switched off and you're working on automatic pilot? Yup? Well, I was switching everything off for the night (including me) and heading up the stairs, passing the bowl dimly lit by the stair light, and it hit me. What if it wasn't a bowl?

I have been so locked into thinking 'vessel' that I had missed the obvious - a FLAT piece. Oh, the irony:)) Having a lightbulb moment when that fatigued doesn't do much to promote a restful night's sleep so I gave up and tried hanging it on the wall instead. Tah-da!


Oh, I like! Then I noticed the shadows it was creating....... ooooh! Off the wall it came and back up it went about a foot away, suspended quickly with some cotton from the ceiling. TAH-DA!!


Oh now, what would this be like as a ginormous circle? (Forgetting the fact that this has taken about two solid weeks to make and is only about 45cm/18" in diameter...) Looking at this impartially, the units are a bit too large in scale for the present diameter and would balance a lot better in a larger circle but I will have to have enough dyed yarn and patience to make such a big piece - as well as somewhere to hang it when its finished:))) But I'm thinking I'll have to have a go, somewhere in the near future. Until then, I'll reduce the motif size and stick to a more manageable scale - for now.....:)))


But on to the more practical aspects of the making. The wire is a total success. It bent so easily, maintained the shapes and as long as the spaces between didn't get too large, held together well. The units were stitched together as invisibly as I could make them and I tried to make sure there were enough joins for stability, without compromising the flow of the pattern too much.


The crocheted units have two distinct sides as well. There is the 'right' side which looks nice and smooth and the back which has more visual texture due to the form of the crocheted slip stitch. Again, I fully intended to have the right side facing out but when it was lit up for the photos, the reverse just came to life and it seemed really obvious that it should be the front. Happy surprises all round!


And lastly, the ends! Thank you everyone for all your very helpful and creative suggestions here, on flickr and on ravelry. I tried out a good few ideas but none seemed to gel well with these curly shapes. I eventually decided that any form of disguise was only drawing more attention where it wasn't wanted so I ended up exposing a bit of the lovely copper wire underneath and bending it into a small loop at each end. You can just see the loops in the close-up picture - little glints of copper (aaah, lovely!) - whilst practically helping to keep the stitches on the ends! It works for me till I can think of another solution.

So, it's all finished. I feel a little strange that this baby I've been working on has now been completed. It feels like I've been living with it constantly for so long that I don't want to start anything new quite yet. Maybe I need some quiet time to savour this little achievement and then get back into things tomorrow..... :)


Wednesday, 22 September 2010

Sunburst


I've been experimenting recently with lots of different ways to make strong enough 3D crochet vessels and I thought I'd give the most obvious method - wire - a try this time. I found some wires too inflexible and difficult to mould as well as being too skinny in diameter once crocheted,  so I decided to try wire with its plastic coating still on - like the ones you find in electric cables. In the UK that will be brown and blue colours:)  (the earth wire doesn't have a plastic coating inside the big grey tubing which I stripped off,  just the bare copper - which is very nice in its own right and I will keep for later!)


Ok, so I have my plastic coated wire, and now I can see how it moulds - yummy! Perfectly easily. I thought I'd have to use long nosed pliers but in fact they made little awkward bends rather than smooth curves so I just went with moulding it with my fingers.


Then I started to crochet around the wire with some of my stripey dyed sock yarn - this one is 'mango' ;) Oooh, I'm liking this! Lets get onto another shape and see how it looks......


Oh yes, I think this will work! I will still have to attach the units together like the flowers in the green vessel but that's ok. I'll have to work out a solution to the wire ends though. If I fold them, there will be an unsightly lump in the spiral - not ideal at all - and I have to make sure the end crochet stitches don't slip off either. I'm thinking a little spot of glue but I run the risk of sticky mess on the yarn.....

Aha! Maybe I crochet a little end cap thingy - picturing knitted i-cords here, only in crochet:) A little tube end before crocheting around the wire..... off to see how that works. Back soon!


Sunday, 21 March 2010

Let's twist again

Goodness, Sunday already! It's been a bitty week - a little bit of doing this and that but nothing really finished, so to speak. I worked a whole day on Vivian and will take some more pics to show you how the cabling is looking - very nice:-) But I had to take a break as it was taking over everything! I was getting far too absorbed with it. I think all my conversations were absentminded '..... yes' and  '.......no's' about five minutes after the question was asked - oops! And I had that kind of abstracted feeling you get from reality when you concentrate too hard on something, which took ages to go before I could rejoin the land of the living.

But I do have some progress pics of my green limone sock for you - one down and one to go. I especially like the rib pattern in little groups of three along the top cuff. And you can see what a clean gusset shaping this has at the heel too. No holes here at all and it has a very professional finish - which makes me feel all the more accomplished - thank you Karen:-)

I'm usually last to finish test knits:-) - I like to think I am being thorough rather than being slow!  - so I think this pattern will soon be released. I'll let you know as soon as I do. If you are already familiar with cables and a bit of shaping but haven't ventured into the world of socks yet, this pattern would be an ideal starting point. There are lots of visual aids and online links to technical info if needed so you feel supported all the way. And you get a lovely pair of socks as well. Now I just have to cast on sock no 2 before I fall foul of the second sock syndrome..... Which reminds me I have another cornflower sock to finish at some point, after the Vivian, the little minx socks and baby knits.

Yes, hopefully more on baby knits soon......:-) Have soft yarn, just have to decide what to knit. It's a baby pattern jungle out there!

Wednesday, 10 March 2010

Lemon & Lime Twist


So, I thought I'd surprise you with some more knitting! There is still stuff needing find a home that I really should be concentrating on but I'm very good at ignoring it while I knit my lovely sock:-) Ah, procrastination is my friend - well, my knitting friend anyway!

This lovely sock is a new test knit designed by Karen called Limone Twist (ravelry link). She knitted these in a gorgeous Wollmeise lemon yellow - scrummy! - so I thought I'd do a bit of lemon and lime. You know, I don't think I have a pair of green socks so I think I'll keep these ones for me - if I have any room left in my sock drawer. Well, a girl has to match her outfits and I do wear every colour under the sun so I correspondingly have a LOT of socks. But not green ones - yet:-)


The pattern is a lovely little twisted rib knitted over 4 rows and has a really clever construction.  After knitting through the chart or written instruction - it has both - you suddenly fall straight into the rhythm of it and you are off! This is the quickest I've knitted a patterned sock and I can even watch tv without losing my place at all - praise indeed;-)) I'm only halfway to the heel but I'm looking forward to another new heel to try - a gusset heel on a toe-up sock. I did try this type before, once, but it was so involved with the detailed patterning that it was difficult to appreciate the structure. In this sock I can see how elegant it looks and it will be interesting to knit and see how the shaping is formed. I know! The little things that please!

So lots more tv to watch so I can knit up a sock storm in Lemon & Lime. If the yarn looks familiar, it's the same hand-dyed sweetgrass green I used for my knotty gloves. I had quite a bit left over as well as another skein so I thought the slight stripes would work well on the sole of the sock. Gives it that little lemony feel to the lime don't you think?

Progress report:-)

So, I've got to dye some more yarns soon so I can start my new shawl, get some more sock yarns in the shop - if I don't divert them for my sock drawer:-) -  and get Vivian and some baby knits started. Nothing huge then, she says wryly!

Vivian is on hold at the moment as the lovely deep teal just isn't knitting to gauge - sigh. But I've got my eye on some chunky yarn on Ebay so hopefully I can be up and running in a week or sooner, depending on the post.

The lovely baby yarn I ordered arrived but wasn't quite as soft to the touch as I'd hoped. Lovely colours though. Maybe I can mix and match with other yarns I already have. But baby patterns have been earmarked and should be appearing soon. The good thing about baby knits is they are quick!

So thats us all up to date I think. Going into town tomorrow so I may have a hunt for some Sirdar snuggly. It is SOOO soft! But I'm not sure if the wool shop has it in stock so fingers crossed or it's back to shopping online. See you tomorrow!

Tuesday, 9 March 2010

Luiza Shawl


Remember the shawl competition that Jane was running last week over at Colours from chaos? Y'know, the one I said I'd never win as I was comment no 1? Yup, I WON!!!! I won this lovely shawl pattern - isn't that so cool? Totally amazing as I never win these things. There was a lot of happy dancing going on yesterday:-)) AND a lot of stash rummaging, hunting for the perfect yarn to use.

But I didn't find anything I thought was going to do this pattern the justice it deserves. So, I've decided I'm going to dye some especially for the occasion - maybe I'll call it 'Lucky Luiza' :-)) I'm thinking a lovely deep rich colourway, slightly variegated but only subtle tonal variations, and I think I may even push my limited shawl skills to work with 2ply laceweight instead of the safer 4ply/fingering! (I will dye some fingering too - just in case!) I'm also going to make extra long skeins of fingering (150gms) so I don't run out like I did with the nightsongs shawl - about 2 rows from the end.

I do love the cobweb look and feel of the finer gauge but I'm a bit dubious of my ability to achieve that quality - but if you don't try, you don't learn and this is so nice, I just have to try!!

This is going to be good for me as I really needed to get my ass in gear and start dyeing some more yarns for the shop. It's been languishing a bit so it could do with a revamp for spring. And of course, I may even have a little yarn giveaway nearer the time......:-) I have some new types of yarn to try out - silk/wool mixes in lace and fingering weight as well as some worsted weight wool, so lots of playing will be going on soon!

Thank you Jane for the opportunity to knit up your lovely shawl!

Tuesday, 1 December 2009

Cornflower socks


Taking up a most of my time on the needles right now are these lovely cabled 'Cornflower socks' designed by Karen Scott. These aren't out as a pattern yet as I'm test knitting them but you may recognise the cable pattern from the grey and purple cornflower cowls I've been knitting. I love how this pattern looks so different on a much smaller scale - so intricate and detailed, lovely!

This sock pattern is for top down socks - a new thing for me as I've just kind of stuck to the toe ups really so far. So I was all excited to learn a new technique:-) The instructions are so easy to follow and the cable pattern is now becoming quite familiar to me. I can even watch tv now without losing my place in all the left and right twists! It's taking quite a bit longer than I expected to make progress with a full cabled pattern in sock yarn but I really think this is worth it as I love how its working up -and I'm also not the fastest cable knitter in the world. I really should learn how to cable without a needle as it would probably help the speed issue!


Anyway, back to the pics - I love these cables:-)) And I'm glad I decided on such a definite colour for these as it gives a decided punch to the sock I think. The yarn is one of my hand dyed semi-solids called 'flame red' but for some reason only weighed 98gms so I decided to keep it for myself:-))

Knitting all went fine till I came to the heel. Now, I generally understand the principle - you knit a heel flap, turn to get a base to the heel and then pick up stitches to shape your gusset so you can carry on with the cables down to the toes.


Nice close-up of the heel  so you can see it a bit clearer. It looks lovely and perfect now but I had a bit of a song and dance to get there - let's just say it was definitely a learning curve;-) I must thank Karen for patiently answering my frantic and confused e-mails over the weekend:-)) You're a star! And I've now got heel flaps 'sorted'. Whew!

So now I'm back on cables for the front of the sock and knitting away on the home run down to the toes where I feel I can manage the decreasing and grafting ok:-) I like the feel of going downhill though, that's a novelty! So right now, I'm in the happy state of free-wheeling down the hill, wind in my hair and enjoying myself till I get to the bottom and then I get to start again with the second sock. Yay! :-)

Monday, 23 November 2009

Red Ripley...or 32 days till christmas!


So, we're back to monday again - did you have a nice weekend? The weather here has been pretty awful - lashing rain and gales howling outside with very dark days:-) - so just perfect for snuggling inside with your knitting!

I had a bit of a mini crisis when I read a blog this weekend that blatantly stated 34 days to christmas -34??? Well, today's count will be 32 if you include christmas day. And then I started thinking about all the things I am intending to make as presents and then I started thinking how long each of these would realistically take to make and then I had a mini panic!!!

So, the result of this was, my new red ripley hat - tada!


Quick, easy and looks good when finished = christmas solution:-) This is knitted in chunky/bulky yarn - Paton's solo mohair mix, which I think I can safely say is discontinued as this came from my stash and I remember having a very warm batwing top knitted out of this in the late 80's:-))

Anyway! Moving swiftly on:-) The pattern is another lovely one by Ysolda called 'Ripley' which is part of her new 'Whimsical Little Knits 2' collection. (Both the green veyla mitts and the snapdragon beret patterns that I've knitted are from that collection too). Its meant to be knitted in heavy worsted or aran weight but I had this chunky yarn to hand and loved the colour so I just made a size bigger than stated. In hindsight I maybe should have knitted the large instead of the medium as it is a bit neat on me but it will fit someone else with a smaller head  I'm sure;-)


The pattern itself is very cleverly constructed but simple to make. The initial band can be plain or lace. I chose the lace which is knitted sideways with the slipped stitches picked up along one side to knit the rest of the hat in the round. This construction idea is the same as in the velya mitts so I found it familiar and easy.

The next lovely detail is the extra pleats. In the picture above, I have just finished one pleat just above the lace border - a large tuck created by picking up some stitches from further down and I still had two pleats to go at that stage. This really helps shape the slouchiness of the hat so it doesn't pool messily at the back of your head! A clever way to gather the extra fabric and make it a design feature.


I knitted the less slouchy version and I think it still gives a nicely fitted hat without having that stretched-over-the-head look:-) But the extra slouchy version looks good too and some people have added a pompom!! So, all in all it's a very festive hat indeed;-))

So, 32 days to go and one present down..........

LinkWithin

Related Posts with Thumbnails